Five Steps to Set Up an Effective Content Taxonomy
How to spend less time looking for the right content and more time taking advantage of it
If we, as marketers, struggle to understand what content we have in our library and how to locate the right piece, can you imagine how our customers feel?
We’re too smart to be searching for our companies’ blog posts with the search function on our own websites. We’re too ambitious to plan our content calendars without a clear picture of what we’ve created in the past. And we’re too dedicated to delighting our audience to deliver the same flat content experience to every user on our site.
With a clear and robust taxonomy for our content, we can do better!
This blog explores the concept of content taxonomy, how to set it up, and how marketers can use it to foster efficiency, enhanced audience targeting, and personalized content strategies.
Content taxonomy is the systematic and ongoing organization of content with metadata. It groups similar types of content together to help users, both external and internal to the company, find, sort, and capitalize on the wealth of information available.
It’s what allows marketers to answer questions like:
What content do we have about topic X or topic Y?
What are the gaps in our content library?
What types of content or topics resonate most with our audience?
What content should we add to this personalized newsletter?
How many reports, blogs, and case studies can we create this quarter?
Content taxonomy is the backbone of content management, enabling better structuring, retrieval, and analysis of content across CMS and analytics tools.
Taxonomy metadata: categories and tags
In a well-structured and consistent content taxonomy, metadata such as categories and tags are manually attached to each piece of content in a CMS to denote attributes like:
Subject matter—what the content is about
Target audience—who the content is for (e.g., role, industry, persona, location)
Content type—what format the content is in (e.g., ebook, blog, whitepaper, report)
Contributor—who was involved in creating the content (e.g., editor, customer, partner)
Access level—how the content can be accessed (e.g., paywalled, gated)
These pieces of metadata are stored in your CMS alongside other metadata that’s detected automatically, like publish date, author, URL, etc.
All of this metadata is what makes up a robust content taxonomy. It enriches your content library with meaningful content attributes, then flows into a content analytics tool like Parse.ly, marrying the accessibility of an organized content library with strategic insights from your content performance feedback loop.
Why is content taxonomy important?
Content taxonomy isn’t just about keeping content organized—it’s about strategically enhancing the accessibility and effectiveness of your content marketing efforts.
Content taxonomy helps marketers make content strategy decisions scientifically, not solely based on their gut.
An effective content taxonomy allows you to sort, filter, and parse your content library and your content performance data by the attributes that matter to you. This enables efficient content management, better reporting, personalized experience-building, and predictable scalability.
Efficient content management
By categorizing content effectively, you can quickly identify and select appropriate material for promotion, updates, or repurposing. This means spending less time searching and more time delivering valuable content to your audience.
Robust reporting
A clear taxonomy allows you to generate more insightful reports on how different topics perform and what audiences prefer. This data is crucial for understanding engagement patterns and refining marketing strategies to better align with audience needs.
Balanced content production
With a comprehensive view of what exists and what’s lacking, marketers can plan a balanced content strategy that covers all relevant topics and formats without redundancy. This helps maintain a fresh and diverse content calendar that appeals to different segments of the target market.
Personalized content experiences
Tailoring content experiences to meet the specific needs of various audience segments becomes feasible with a structured content taxonomy. It allows you to build content hubs focused on specific topics, industries, or user behavior, ensuring that users find the information most relevant to them, increasing engagement and conversion rates.
Predictability and scalability
A well-defined content taxonomy introduces predictability to content production and management. It provides a framework that can easily be scaled as the organization grows or as the market evolves. This structure ensures that even with increasing volumes of content, every piece can be systematically categorized and retrieved.
Setting up your content taxonomy: best practices for marketers
To develop a content taxonomy that’s both manageable and effective, take a holistic approach. That means setting up a solid foundation, planning for scale, and not cutting corners.
Whether you’re starting from square one or looking to revamp or improve your existing content taxonomy, here are the steps to follow:
Step 1: Determine your content attributes—how you’ll group your content
Building your marketing content taxonomy starts with a few questions:
What do we want to know about our content?
How do we want to group it?
What questions do we need to be able to answer about it?
Based on your content strategy, ideal customer personas, and business model, answer these questions and define the content attributes you’d like to attach to your content. They should be concise and consistent, balancing general and specific.
Gather input from different departments like Sales, Marketing, and Customer Support to understand which distinctions or groupings would be helpful for them.
Demand Generation might want to denote content access type—whether a piece is gated or ungated—so they know what to promote for lead generation.
PR might want to know which funnel stage each piece of content targets so they can find the right stories to pitch.
Support and Sales might want to denote which topic each piece of content is about so they can easily find helpful information to send to customers and prospects.
Marketing might want to know which industry each piece of content is targeted at so you can balance the content production for each of your target audiences.
Decide the types of attributes to be denoted (content type, access level, target audience, etc.), along with the possible variants within each attribute type. For the most part, the variants for each attribute type should be mutually exclusive (with a clear in-group and out-of-group distinction).
For example, if a piece of content is gated, it wouldn’t also be ungated. If a report is top-of-funnel (TOFU), it wouldn’t also be BOFU. And if a case study is about a customer in the media industry, that customer wouldn’t also be in a public sector industry.
Note: The topic or subject-matter attribute is an exception to this rule because one content piece often covers multiple topics.
At WordPress VIP, we market to and support customers in a variety of roles and industries through an assortment of content types across various topics. To organize and optimize the wide range of campaigns and content programs we run, we set up content taxonomy to denote the following attributes:
Role—which target role the content speaks to (creative marketers or technical IT teams)
Industry—which target industry the content speaks to (media, public sector, or non-media enterprise brands)
Funnel stage—which stage of the marketing funnel is the content geared towards (top-, middle-, or bottom-of-funnel)
Content type—the format of the content (blog, ebook, glossary, webinar, report, etc.)
Subject matter—what the content is about
Step 2: Define your taxonomy—how you’ll denote content attributes
Now, decide how you’ll denote each of your target attributes, using category and tag values in your CMS.
In many CMSes, one piece of content can have one category and multiple tags. Determine how you’ll use these pieces of metadata to capture the content attributes you’d like to denote.
Category
We suggest using category to denote an attribute that is: 1) applicable to every piece of content in your library, and 2) completely mutually exclusive between content pieces—where there will be no room for misinterpretation.
Many media organizations use category to denote content “Section,” which is often based on the topic of the content. They might have a sports section, a food and drink section, a travel section, and so on, and they’ll give each of their articles a specific category variant to group them into one of those topic sections.
In marketing, however, the breadth of content topics covered tends to be narrower, so marketers might use category to denote a different attribute aside from topic.
At WordPress VIP, we use category to denote content type. Each piece of content is given one category variant based on what type of content it is:
Content type
Category variant
Blog article
“Blog”
Case study
“Case Studies”
Report
“Reports”
Toolkit
“Toolkits”
Worksheet
“Worksheets”
Ebook
“Ebooks”
Webinar
“Webinars”
Live event
“Live Events”
Glossary page
“Glossary”
Partner page
“Partner Pages”
Product page
“Product Pages”
Not specified
“Other Pages”
Because we create many types of content with a small team, it’s important to monitor the amount of content we create and the impact each type has so we can allocate resources appropriately.
Tags
Now, with the decision on which attribute to denote with category made, start thinking how you’ll use tags to denote the rest of your content attributes.
Because you’ll use this one type of metadata to denote several different attributes, we suggest developing clear and distinct “tag types” with specific syntax for each to maintain clarity. Each tag type will represent a content attribute, and the variants within each tag type will represent the possible values of that attribute.
For example, if you’re using tags to denote content access type—whether a piece is gated or ungated—you might make an “access” tag type with the possible variants being “access: gated” and “access: ungated.”
At WordPress VIP, we use tags to denote role, industry, funnel stage, and subject matter. Each attribute has its own tag type, and the tag variants within each have a specific syntax to denote the tag type.
Attribute / tag type
Tag variant syntax
Role
“role: creative”
“role: technical”
Funnel stage
“stage: tofu”
“stage: mofu”
“stage: bofu”
Industry
“industry: media”
“industry: enterprise”
“industry: public sector”
Subject matter
[subject matter] (no specific syntax)
For each tag type (aside from subject-matter tags), we have a finite number of tag variants. We have two role tag variants, three funnel stage variants, and three industry variants, meaning that the variants listed above are the only options available for each of those tag types.
The number of variants for our subject-matter tags isn’t finite because the list of topics we create content about is always evolving (and growing). We have more than 100 subject-matter tags, making them the most diverse tag type we use. This is also why we don’t use a specific syntax for subject-matter tags.
Similarly, if you’re using tags to denote an attribute like “contributor”—who was involved in creating the content besides the author—the number of tag variants might not be finite.
Step 3: Define your taxonomy rules—how you’ll keep it consistent
Now that you’ve mapped out your content attributes and translated them into categories, tag types, and tag variants, it’s time to set rules and guidelines for when and how to categorize and tag content.
This step is crucial in maintaining the utility of your content taxonomy. These rules will guide you and your team through the content audit phase—when you overhaul the tags and categories on all of your content to transition to your new taxonomy—and beyond.
How strict or lenient will you be when adding categories and tags to content?
How relevant does a piece of content need to be to warrant adding a certain category or tag?
Answering these questions will help you maintain a consistent mindset as you audit your content library to ensure that the resulting taxonomy is accurate and useful. Without consistency in how you categorize and tag your content, even the most well-defined content taxonomy will generate more red herrings than real insights.
The ultimate goal of this step is to create a list of rules that explain which categories and tags to add to any piece of content, with little to no room for interpretation. Crystal clear guidelines can save time by splitting up the content audit between several people without sacrificing consistency.
To define your taxonomy rules, answer the following:
How many tags can one piece of content have?
How relevant does a piece of content need to be to warrant a certain tag or category?
Can one piece of content have multiple variants of the same tag type?
Does every piece of content need to have one variant from each tag type?
If you add categories and tags to your content too generously, they lose their meaning. But if you’re too strict, you miss out on valuable information.
For example, the content an internet software company creates might always pertain in some way to “the internet,” but would having an “internet” subject matter tag on every piece of content actually be helpful? Or if a piece of content mentions the “media industry” in passing but is mainly focused on the public sector industry, would adding an “industry: media” tag really mean anything?
The rules you create for your taxonomy depend fully on your taxonomy, your content strategy, and your needs.
Below are the rules we set up for our content taxonomy at WordPress VIP. In general, we take a strict approach to content taxonomy—not forcing a tag onto a piece of content unless it truly fits:
Category
As mentioned, give each piece of content one category variant based on what type of content it is.
Give each piece exactly one category—no more, no less.
Role tags
Give each piece of content from zero to two role tags.
Only tag a piece with a role tag if it speaks specifically and directly to a certain role.
If the piece speaks directly to both the creative and technical roles, add both the “role: creative” and “role: technical” tags. If it speaks to neither, don’t add any role tags.
Never add role tags to partner pages, product pages, and live events.
Funnel stage tags
Give each piece of content either zero or one funnel stage tag.
Give every content type, except for partner pages, product pages, and live events one funnel stage tag, based on which stage of our marketing funnel it fits in.
Industry tags
Give each piece of content anywhere from zero to three industry tags.
Only tag a piece with an industry tag if it speaks specifically and directly to a certain industry. If the piece speaks directly to more than one industry, add multiple industry tags accordingly. If it doesn’t speak directly to any of our three target industries, don’t add any industry tags.
Never add industry tags to partner pages, product pages, and live events.
Subject matter tags
Every piece of content should have at least one subject matter tag (likely more).
Add a subject matter tag for each main topic a piece covers.
If a piece names a customer or partner by name, add that name as a subject matter tag.
Use as few subject matter tags as possible, but be comprehensive.
Always check autofill when entering a subject matter tag in WordPress. If any relevant tags already exist, use them instead of creating a new, slightly different tag (“WordPress VIP” vs. “WPVIP” or “API” vs. “APIs).
Don’t add subject matter tags to a piece if those tags are redundant with role or industry tags already assigned to that piece.
Don’t add subject matter tags to live events or product pages.
Step 4: Implement the taxonomy—bringing it to life
Once your taxonomy rules are solidified, it’s time to start implementing your new content taxonomy.
Follow these steps:
Access your entire content library within your CMS.
Remove all previous categories and tags from every piece/URL.
Add your new categories and tags to every piece/URL.
This metadata audit can be performed manually, programmatically with CSV files, or with a combination of both.
Follow your taxonomy rules to a “T” while performing this audit. Again, consistency is everything here.
If there’s bandwidth across your team, split up the audit between a few people to save time. But make sure everyone involved understands and follows the categorization and tagging rules and during the audit. If questions about guidelines arise, discuss and resolve them as a team to avoid any inconsistencies.
Once you complete the audit, take a deep quality assurance pass to ensure that your CMS is now filled with categories and tags from your newly defined content taxonomy.
Every relevant piece of content should have new metadata, and categories or tags from previous taxonomies should be eliminated.
Also, double-check that the new category or tag values within your CMS are free of typos, formatting errors, or other inconsistencies.
Finally, once you’re confident that all the new metadata in your CMS syncs with your new content taxonomy, ask your content analytics provider to recrawl the metadata from your CMS, rebuilding as much historical data as possible so that your new taxonomy is reflected in your analytics tool.
Then, do a QA pass on that metadata in your analytics tool to make sure everything is showing up correctly.
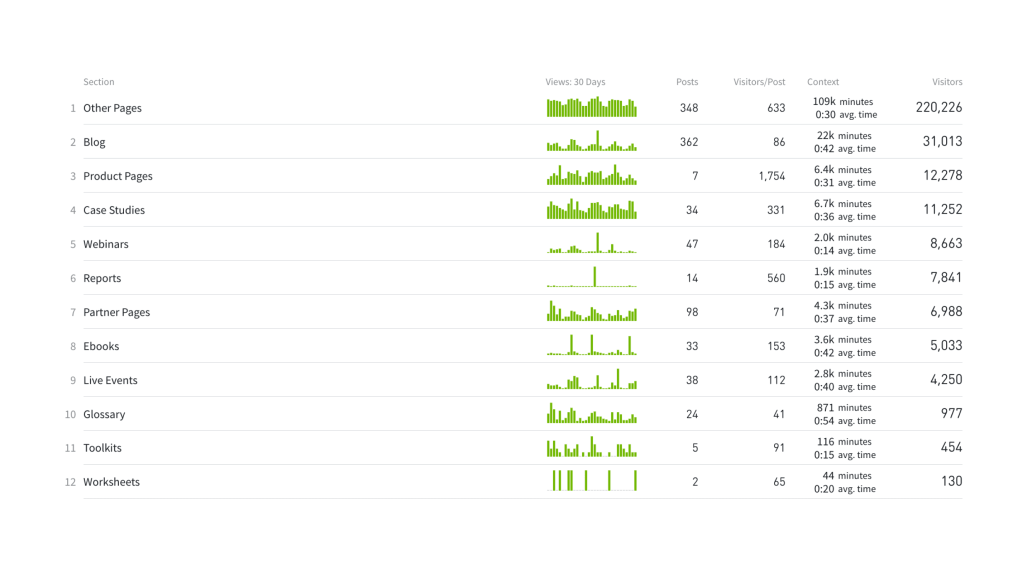
Let’s look at how WordPress VIP’s content taxonomy shows up in our analytics tool, Parse.ly.
Below you’ll see all of our content types listed in the “Sections” view of Parse.ly, as “Sections” pulls data from the “Category” field in our CMS. Notice that we can see how much traffic and engaged time each content type received in the selected timeframe, along with how many posts were created within each content type.
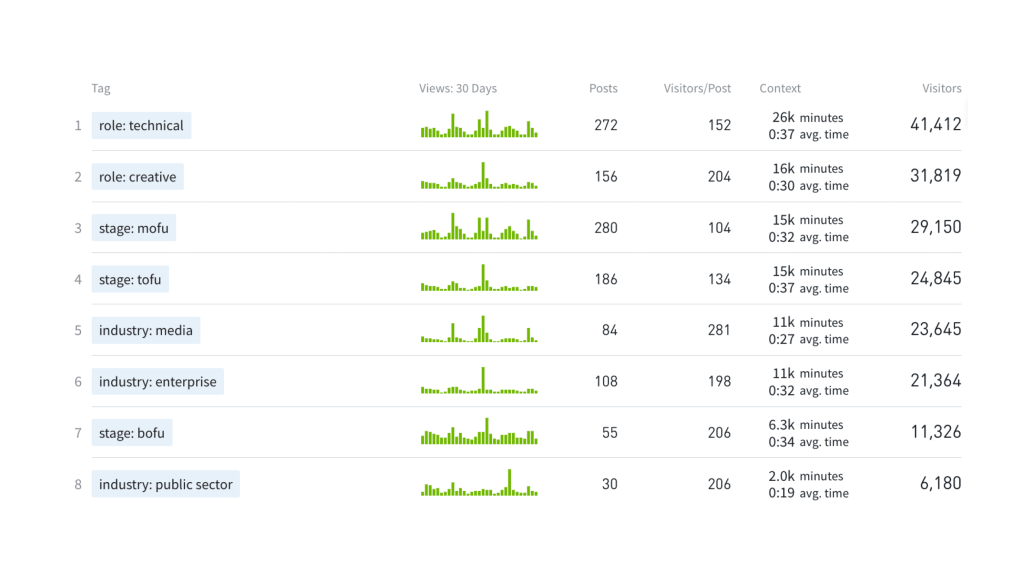
Then, in our “Tags” view, we see all of our role, industry, and funnel stage tags and their corresponding traffic, engagement, and volume:
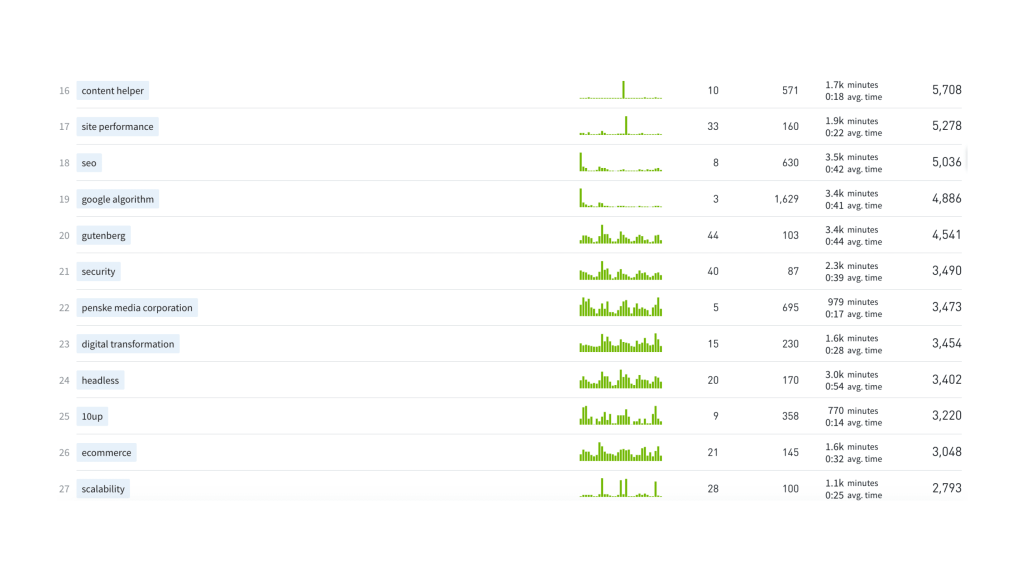
And finally, if we filter out our role, industry, and funnel stage tags, we see this same performance data for our subject matter tags:
Step 5: Bake in metadata QA to your publishing workflow—maintaining your taxonomy
Now that your new taxonomy is live and QAed in your CMS and analytics tool, the heavy lifting is done. From here, you just need to make sure that you and your team continue categorizing and tagging correctly as new content is published going forward.
With most setups, when a post is published from the CMS, the corresponding metadata is immediately sent to the analytics tool. That’s why it’s crucial to add all the correct categories and tags to content before it goes live. Otherwise, you’ll need to recrawl and rebuild metadata for that content after the fact, an extra manual step.
Train everyone on your team who builds and publishes content in your CMS on your new taxonomy and guidelines. Make sure they understand each category and tag type, and how to categorize and tag content in your CMS.
Then bake in a metadata QA step to your publishing workflow, double-checking that the correct category and tags are attached to each piece of content before it goes live.
What’s next?
With your content taxonomy live and your metadata QA process solidified you’re ready to start reaping the benefits of your taxonomy overhaul.
Take a look at the new content groupings in your analytics tool and see how easy it is to find relevant content for a target role, persona, industry, or topic.
Look at the reach and engagement for content within each grouping to optimize content production and promotion efforts.
Use your new content groupings to build personalized newsletters or content hubs.
Most importantly, train teams on how they can benefit from your new taxonomy.
Show Sales how to locate relevant content pieces to send in demo follow-ups.
Teach Web how to use tags to personalize web experiences for different audiences.
And suggest how Content can measure the balance of content production for different funnel stages.
For more tips on taking full advantage of your renovated taxonomy, stay tuned! Part two of this content taxonomy guide is coming soon. Meanwhile, reach out to me with any questions about content taxonomy or to share your experiences organizing your content.
Related content
What Is the Ideal Word Count for Articles and Other Pieces of Content?