- Contributors: automattic, nbachiyski, batmoo, johnjamesjacoby, philipjohn
- Tags: liveblog
- Requires at least: 4.4
- Requires PHP: 5.6
- Tested up to: 4.9.8
- Stable tag: 1.9.6
- License: GPLv2 or later
- License URI: http://www.gnu.org/licenses/gpl-2.0.html

Empowers website owners to provide rich and engaging live event coverage to a large, distributed audience.
Your readers want your updates as quickly as possible, and we think we provide the easiest and the most flexible publishing environment to make that happen. Sometimes though, that’s just not enough.
When you’re covering a fast-paced event — the latest Apple unveiling, an F1 Grand Prix, or the Super Bowl — a full blog post for each individual update is a poor experience for your authors and your audience.
The WordPress.com VIP Liveblog Add-On was purpose-built to address these issues specifically.
Here’s what makes it special:
- Post updates right from the front-end of your site (no need to use the
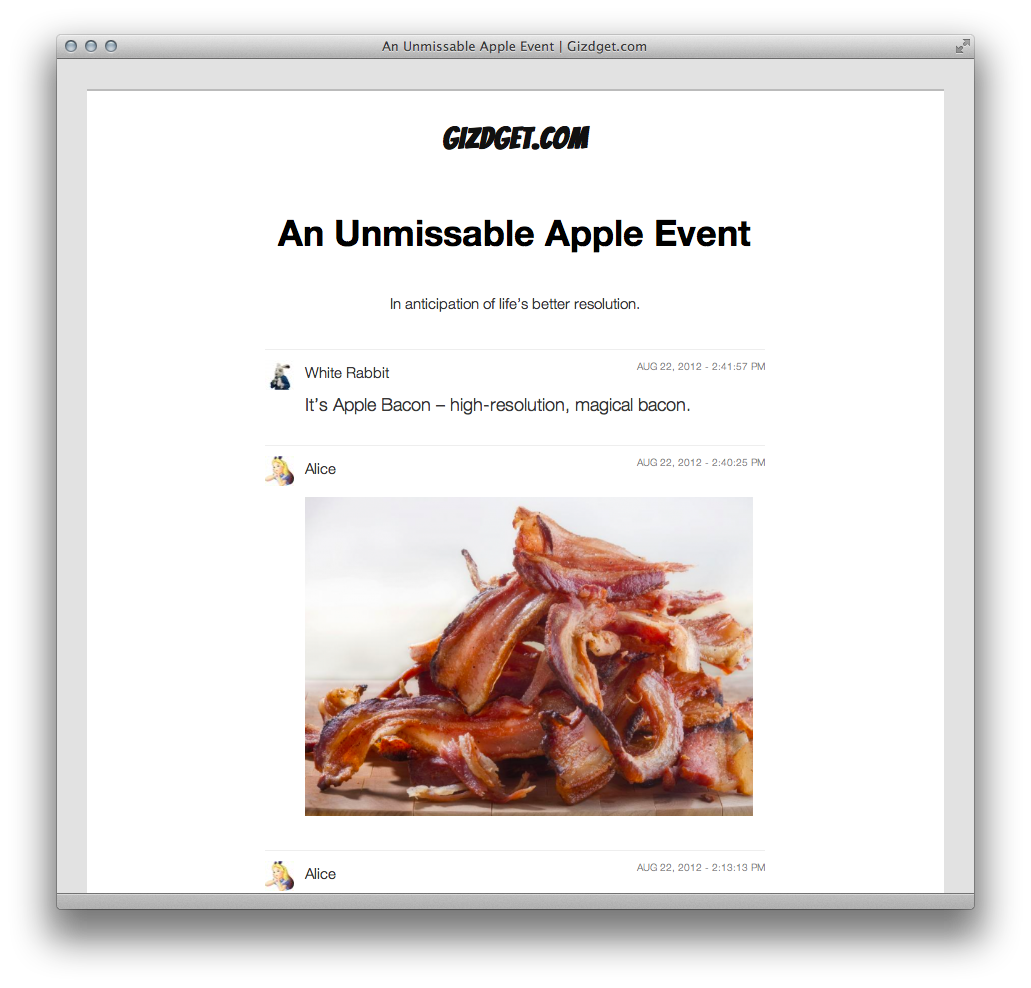
/wp-admindashboard) - Viewers of your Liveblog get new entries served to them instantly and automatically, without needing to refresh their browser.
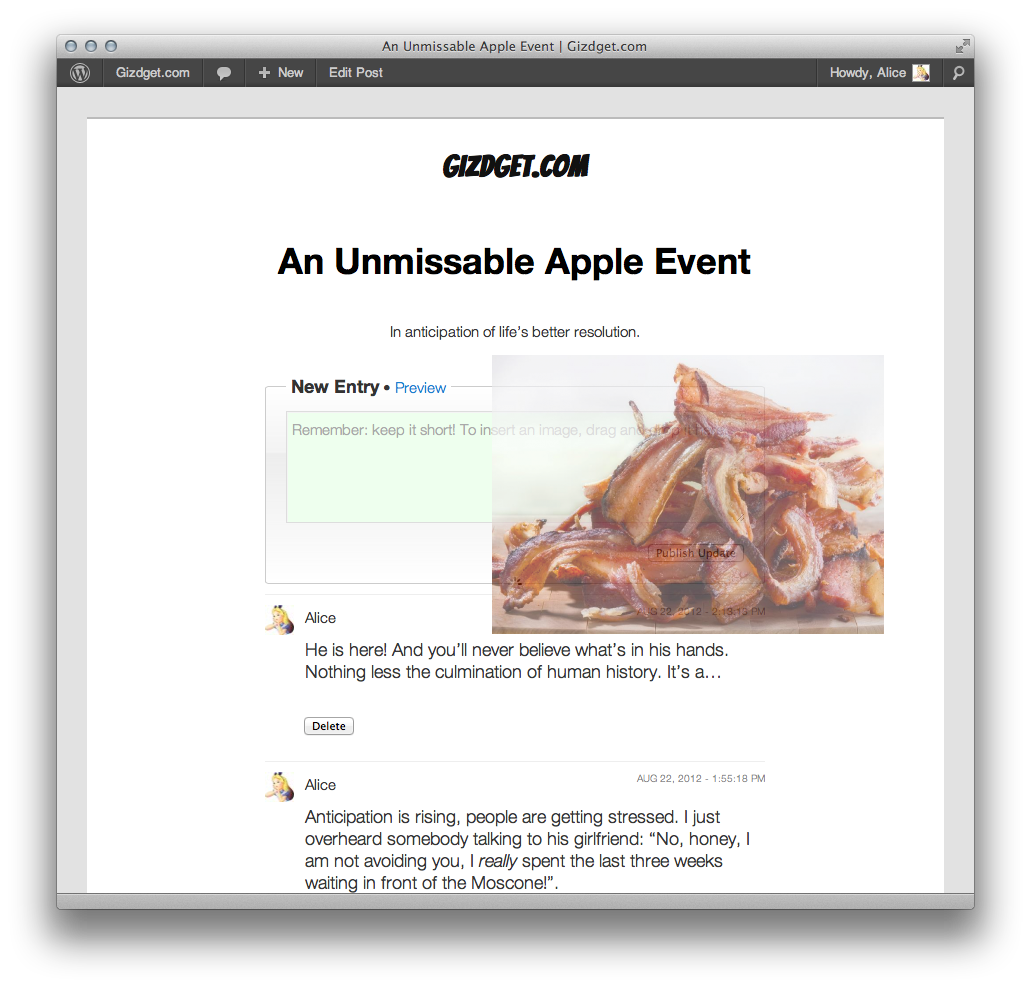
- Your authors can drag-and-drop photos right into the Liveblog area, without needing to navigate to separate browser tabs or windows.
- There’s no need for a separate site dedicated to liveblogging: every post can be a liveblog, even existing ones.
If you'd like to check out the code and contribute, join us on github, pull requests are more than welcome.
- Upload the
liveblogfolder to your plugins directory (e.g./wp-content/plugins/) - Activate the plugin through the 'Plugins' menu in WordPress
- You can enable the liveblog on any post's edit page
The entry system supports #hashtags, /commands, @authors and :emoji: with an autocomplete system to help speed up the process. These extensions are filtered on save, for example a hashtag #football would be saved as <span class="liveblog-hash term-football">football</span> allowing easy styling. The container of the entry will also receive the same class term-football.
The command system has one inbuilt command:
/key: Which defines an entry to a key event, it adds the meta key to entry liveblog_key_entry. A key event can be styled using the .type-key class.
To display a key event box you can add the [liveblog_key_events] shortcode in your theme, e.g. in the sidebar, or you can use the Liveblog Key Events widget. Entries used with the key command will be inserted to both this box and the main feed. It also acts an anchor system to jump to parts of the main feed. It's not necessary to include the shortcode for the /key command to be enabled.
An example of using the key command would be an author writing the following in the New Entry box:
New iPad announced, launching next week — more info to come. /key
You can add new commands easily with a filter, the most basic command will add a class to entry, so you could do a simple /highlight which would add type-highlight to the entry container, letting you style the background color:
add_filter( 'liveblog_active_commands', 'add_highlight_command', 10 );


function add_highlight_command( $commands ) {
  $commands[] = highlight;
  return $commands;
}
A command can have both a filter called before the entry is saved, or an action that is called after it’s saved:
apply_filter( "liveblog_command_{$command}_before", $arg );
do_action( "liveblog_command_{$command}_after", $arg );As mentioned earlier you can add the key events section by using [liveblog_key_events]. If you wish to change the title from the default Key Events then you can add a title attribute:
[liveblog_key_events title="My New Title"]If want to remove the title, good example when placing the shortcode in a widget.
[liveblog_key_events title="false"]A key event entry can be altered in to two ways:
Template: This is how each entry will be rendered. There are two inbuilt templates: list and timeline, or you can add your own using a filter:
add_filter( 'liveblog_key_templates', 'add_template' );

function add_template( $templates ) {
  $templates['custom'] = array( 'key-events.php', 'div', 'liveblog-key-custom-css-class' );
  return $templates;
}
There's a few things to note here:
key-events.phppoints toliveblogfolder in the current active theme directory, in this case we our loading template fileliveblog/key-events.php.divis where we set the element type that wraps all entries, in the case where you wanted to build a list, you would set this toul.liveblog-key-custom-css-classis a class that will be added to the wrapper element of the entry to help with styling, in this case it would look like:<div class="liveblog-key-custom-css-class">...</div>
An example of a template file is:
<div class="<?php echo esc_attr( $css_classes ); ?>" >
	<a href="#liveblog-entry-<?php echo esc_attr( $entry_id ); ?>">
		<?php echo WPCOM_Liveblog_Entry_Key_Events::get_formatted_content( $content, $post_id ); ?>
	</a>
</div>
Format: This is how each entries content is filtered, there are three inbuilt formats:
- Full - which shows content without filtering
- First Sentence - which will return everything until it hits either
.?! - First Linebreak - which will return everything until it hits a linebreak (Shift + Enter) or
<br />.
Formats add an extra level of control to how the key events section looks. If using the timeline template with first sentence and the following is entered into the new entry box:
New iPad announced. With plan to ship next month, pre-orders starting 23rd September retailing at $499 for 16gb $599 32gb. /key
The main feed would show the full text, and the key events section would only show:
New iPad announced
You can add your own using a filter:
add_filter( 'liveblog_key_formats', 'add_format' );

function add_format( $formats ) {
  $formats['strip-tags'] = 'new_format';
  return $formats;
}

function new_format( $content ) {
  $content = strip_tags( $content );
  return $content;
}
In the example above we are adding a format Strip Tags, which removes any HTML tags from the content.
Below is the full example of adding both:
function liveblog_add_key_event_template() {

	add_filter( 'liveblog_key_templates', 'add_template' );
	add_filter( 'liveblog_key_formats',   'add_format' );

	function add_template( $templates ) {
		$templates['custom'] = array( 'key-events.php', 'div', 'liveblog-key-custom-css-class' );
		return $templates;
	}

	function add_format( $formats ) {
		$formats['strip-tags'] = 'new_format';
		return $formats;
	}

	function new_format( $content ) {
		$content = strip_tags( $content );
		return $content;
	}
}

add_action( 'init', 'liveblog_add_key_event_template' );
Selecting which template or format to use for liveblog happens in the admin panel on the edit of page of the post:
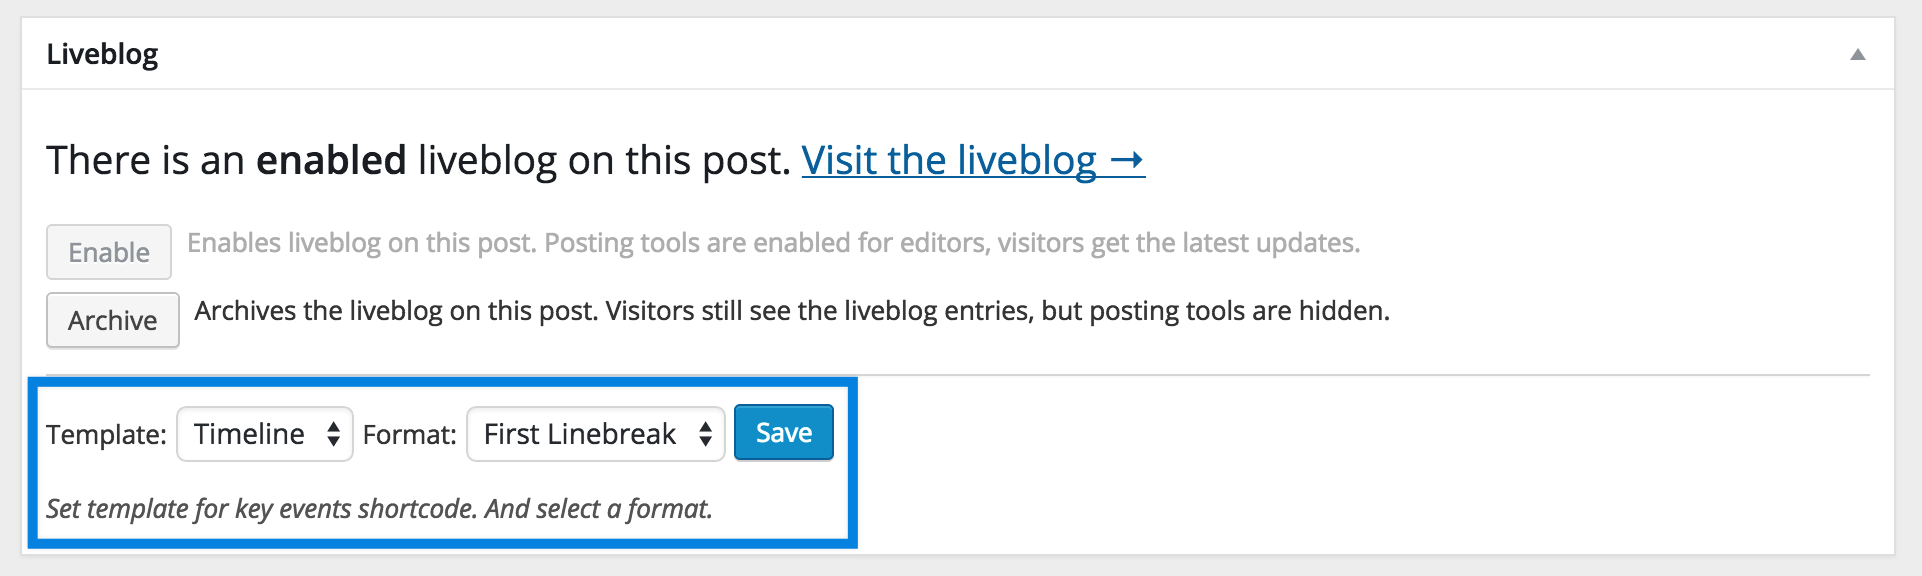
Hashtags are manageable in the admin area. Under Posts there will be a menu for Hashtags. Please note that the slug is used, not the name.
When a :emoji: is inserted into an entry it is converted into:
<img src="//s.w.org/images/core/emoji/72x72/1f44d.png" class="liveblog-emoji emoji-+1">
If you need to extend the Admin Meta Box there are a few filters and actions to make this easier. As an example, let's add a section with a text input and a button to save. To start we need to add the fields:
Filter
add_filter( 'liveblog_admin_add_settings', array( __CLASS__, 'add_admin_options' ), 10, 2 );

public static function add_admin_options( $extra_fields, $post_id ) {
  $args = array(
    'new_label'  => __( 'My new field', 'liveblog' ),
    'new_button' => __( 'Save', 'liveblog' ),
  );

  $extra_fields[] = WPCOM_Liveblog::get_template_part( 'template.php', $args );
  return $extra_fields;
}
Template
<hr/>
<p>
  <label for="liveblog-new-input"><?php echo esc_html( $new_label ); ?></label>
  <input name="liveblog-new-input" type="text" value="" />
  <button type="button" class="button button-primary" value="liveblog-new-input-save"><?php echo esc_html( $new_button ); ?></button>
</p>
Next we catch when the user has clicked our new save button liveblog-new-input-save:
add_action( 'liveblog_admin_settings_update', array( __CLASS__, 'save_template_option' ), 10, 3 );

public static function save_template_option( $response, $post_id ) {
  if ( 'liveblog-new-input-save' == $response['state'] && ! empty( $response['liveblog-new-input-save'] ) ) {
      //handle your logic here
  }
}There is five useful filters to alter entries at current stages:
Before inserting into the database
add_filter( 'liveblog_before_insert_entry', array( __CLASS__, 'filter' ), 10 );

public static function filter( $entry ) {}
Before inserting updated entry into the database
add_filter( 'liveblog_before_update_entry', array( __CLASS__, 'filter' ), 10 );

public static function filter( $entry ) {}
Before we show preview (how we convert :emoji: back to <img>)
add_filter( 'liveblog_preview_update_entry', array( __CLASS__, 'filter' ), 10 );

public static function filter( $entry ) {}
Before we allow the entry to edited (how we convert <img> back to :emoji:)
add_filter( 'liveblog_before_edit_entry', array( __CLASS__, 'filter' ), 10 );

public static function filter( $content ) {}
Before the entry JSON is sent to the frontend
add_filter( 'liveblog_entry_for_json', array( __CLASS__, 'filter' ), 10, 2 );

public static function filter( $entry, $object ) {}It is possible to set your own symbol and / or change the class prefix for #hashtags, /commands, @authors and :emoji:. These are handled by filters:
add_filter( 'liveblog_{type}_prefixes', array( __CLASS__, 'filter' ) );
add_filter( 'liveblog_{type}_class', array( __CLASS__, 'filter' ) );
Let’s say you decide to use ! instead of # for #hashtags, therefore you expect them to be !hashtag:
add_filter( 'liveblog_hashtags_prefixes', array( __CLASS__, 'filter' ) );

public static function filter( $prefixes ) {
  $prefixes = array( '!', '\x{21}' );
  return $prefixes;
}
Currently hashtags use the class prefix term-, you can change that to whatever you need - in this case let’s change to hashtag-:
add_filter( 'liveblog_hashtags_class', array( __CLASS__, 'filter' ) );

public static function filter( $class_prefix ) {
  $class_prefix = 'hashtag-';
  return $class_prefix;
}Developers have to ability to exclude shortcodes from being used within the content of a live entry. By default the in built key events widget short code is excluded, but others can be added easily enough from within the themes functions.php.
    // Added to Functions.php

    function liveblog_entry_add_restricted_shortcodes() {

    	add_filter( 'liveblog_entry_restrict_shortcodes', 'add_shortcode_restriction', 10, 1 );

    	function add_shortcode_restriction( $restricted_shortcodes ) {

    		$restricted_shortcodes['my-shortcode'] = 'This Text Will Be Inserted Instead Of The Shortcode!';
    		$restricted_shortcodes['my-other-shortcode'] = '<h1>Here is a Markup Shortcode Replacement</h1>';

    		return $restricted_shortcodes;
    	}
    }

    add_action( 'init', 'liveblog_entry_add_restricted_shortcodes' );
The functionality takes a associative array of key value pairs where the key is the shortcode to be looked up and the value is the replacement string.
So, given the example above an editor adding any of the shortcode formats:
[my-shortcode] / [my-shortcode][/my-shortcode] / [my-shortcode arg="20"][/my-shortcode]
would see This Text Will Be Inserted Instead Of The Shortcode! outputted on live entry.
By default the inbuilt [liveblog_key_events] shortcode is replaced with We Are Blogging Live! Check Out The Key Events in The Sidebar.
To override this behaviour simple redefine the array key value:
$restricted_shortcodes['liveblog_key_events'] = 'Here is my alternative output for the shortcode! <a href="/">Click Here to Find Out More!</a>';This feature was added at the request of the community and solves the issues where Editors will forget to archive old Live Blog's leaving them live indefinitely.
Auto archive works by setting an expiry to the Post Meta for live blog posts. This expiry is calculated using the date of the latest liveblog entry + the number of days configured.
Once the expiry date is met the live blog post will be auto archived. It is however possible to re-enable an auto archived Live Blog Post, simply click the enable button in the post Liveblog meta box and the expiry will be extended by the number of days configured from the latest liveblog entry date. The auto archiving feature will then re-archive the post at the new expiry date.
In order to configure the number of days to autoarchive after, a filter has been implemented. By default the value is NULL and as such disables the feature. To enable it simply apply a value to the filter e.g:
add_filter( 'liveblog_auto_archive_days', function( $auto_archive_days ) {
  $auto_archive_days = 50;
  return $auto_archive_days;
}, 10, 1 );
By default this plugin uses AJAX polling to update the list of Liveblog entries. This means that there is a delay of a few seconds between the moment a entry is created and the moment it is displayed to the users. For a close to real-time experience, it is possible to configure Liveblog to use WebSockets instead of AJAX polling. To achieve this, Liveblog uses Socket.io, Redis and socket.io-php-emitter (responsible for sending messages from PHP to the Socket.io server via Redis).
It is important to note that, since for now the Socket.io server has no way to tell if a client is an authenticated WordPress user or not and what are its capabilities, WebSockets will be used only for public Liveblog posts.
Follow the instructions below to enable WebSocket support.
Here is a list of what needs to be installed on the server to enable WebSocket support:
- Node.JS - to run the Socket.io server.
- Redis - responsible for sending messages from WordPress to the Socket.io server.
- Composer - to install socket.io-php-emitter and Predis (Redis client).
- PHP >= 5.3
Connected via SSH on the server, it is necessary to run the following commands from the Liveblog plugin directory to install WebSocket support dependencies:
composer install     # to install socket.io-php-emitter and Predis (a PHP client for Redis)
cd nodeapp
npm install     # to install socket.io and the adapter socket.io-redis
Add the following constants to wp-config.php to configure Liveblog plugin to use WebSockets:
LIVEBLOG_USE_SOCKETIO: set this constant to true to enabled WebSocket support. Default: false.LIVEBLOG_SOCKETIO_URL: URL used by the Socket.io client to connect to the Socket.io server. Default: YOUR_SITE_DOMAIN:3000.LIVEBLOG_REDIS_HOST: Redis server host. Default: localhost.LIVEBLOG_REDIS_PORT: Redis server port. Default: 6379.
To start the Socket.io server go to the plugin directory and run:
node nodeapp/app.js
This will start a Socket.io server on port 3000 listening to a Redis server running on localhost:6379. It is possible to use the parameters bellow to change the app default values:
--socketio-port [port]
--redis-host [host]
--redis-port [port]
For more information on the accepted parameters run:
node nodeapp/app.js --help
To test that everything is working, after following the steps above, open a Liveblog post in two different browser windows and check that whenever a user changes the list of entries in one window, the list in the other window is refreshed in "real-time". It is also possible to use the browser developer tools to verify that there are no AJAX requests being sent every few seconds to check for changes in the list of entries. Instead the browser is receiving changes using a single WebSocket connection whenever they occur.
When using Liveblog with WebSocket, the plugin will create a unique key for each Liveblog post (based on the post ID and its status). This key is shared with the users with permission to see the corresponding post when the page is loaded. The key is then send by the user's browser to the Socket.io server when a connection is established. Whenever there is a new Liveblog entry (or a Liveblog entry is updated or deleted), the Socket.io server will send a message only to the clients that provided the right key. This system is enough to prevent someone without permission to see the post from receiving Liveblog entries emitted by the Socket.io server but it has an important limitation. Once a user with permission receives the post key, if he saves it somewhere, he will be able to receive messages from the Socket.io server for that particular post even if for some reason he loses access to the post (for example if the user is removed from WordPress).
If you are using private Liveblog posts to share sensitive data and it is important that, once a user loses access to the post, he is not able to receive messages emitted by the Socket.io server anymore, consider using the 'liveblog_socketio_post_key' filter to implement your own criteria to generate the post key. For example, you could generate a random post key for each post that is saved as a post meta and that can be manually invalidated by an editor whenever necessary.
If for some reason the plugin is not able to use WebSockets to refresh the list of entries, below is a list of tips that might help you debug where is the problem:
- Use your browser developer tools network tab to check if a WebSocket connection was established or check the browser console for errors when trying to establish it.
- Check if the Node.js app that starts the Socket.io server is running. The app won't start or will stop running if unable to connect to the Redis server.
- The plugin will fallback to AJAX polling if unable to connect to the Redis server.
- It is possible to see all the messages received by the Redis server using the command
redis-cli MONITOR - To see Socket.io server debug messages start the Node.js app with the command
DEBUG=socket.io* node nodeapp/app.js
The liveblog lives inside of a regular WordPress post. First create a new post, complete with title, category, and maybe a short introduction. Once the liveblog plugin is installed, you will see a liveblog box on your "Edit Post" page. Simply click "Enable" to activate it, and publish the post.
If you can't find the box, be sure that it is toggled on under "Screen Options" in the top right corner of posting page.

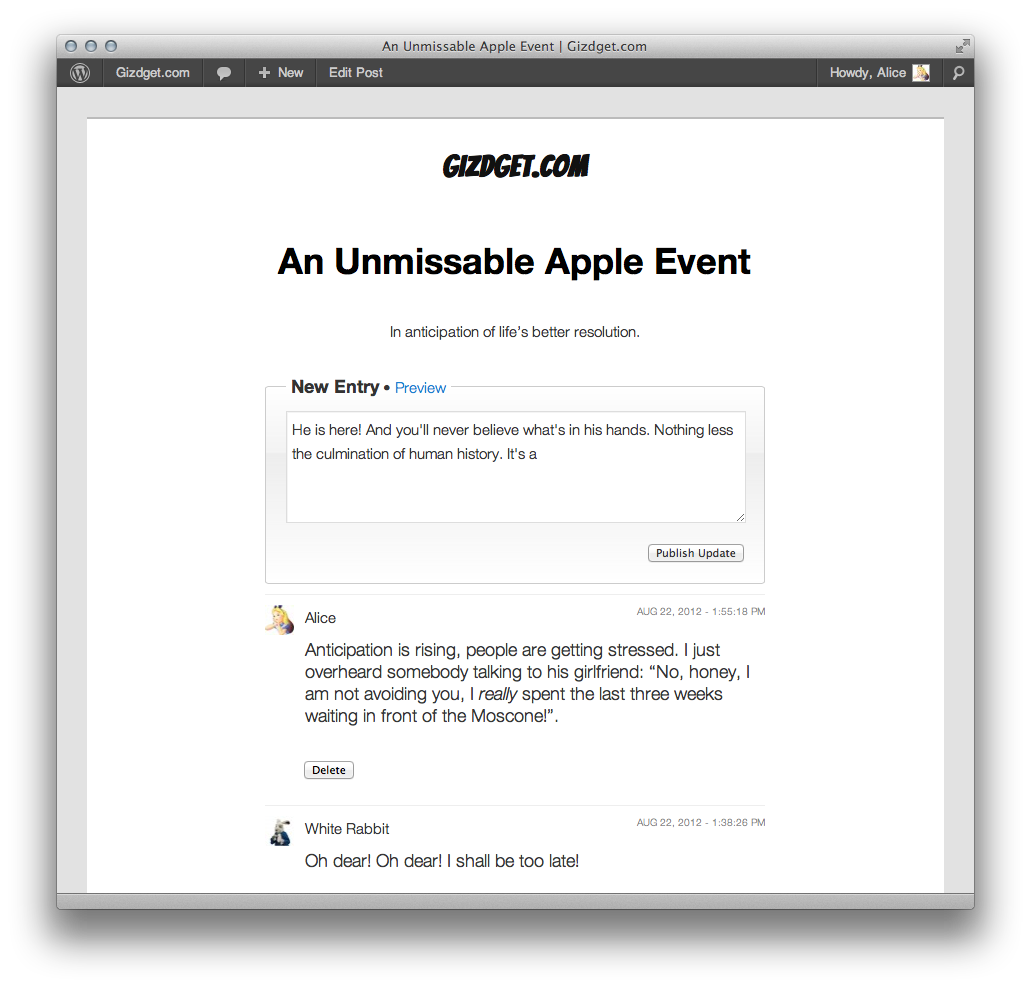
To post to the liveblog, navigate to the live post, and start typing. Click "Publish Update," and your readers will see the post appear at the top of their screen. That's all there is to it.

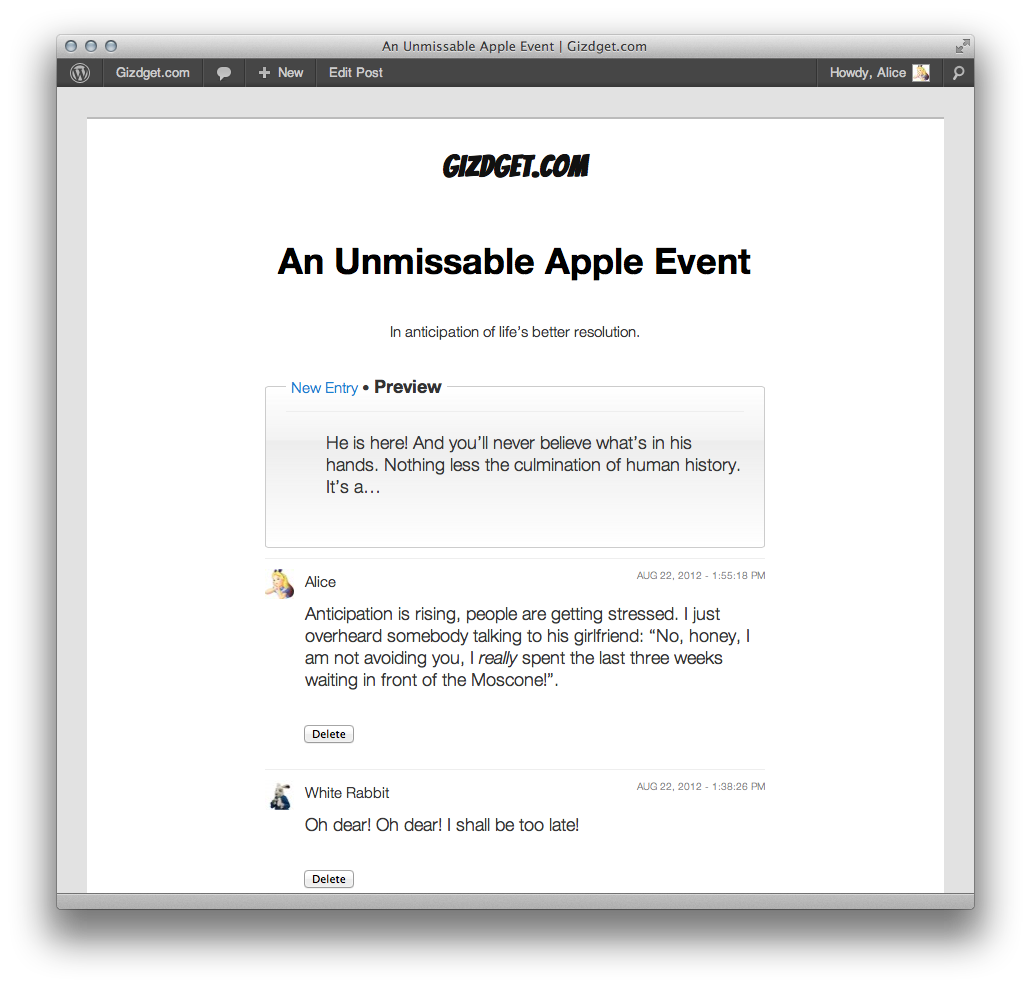
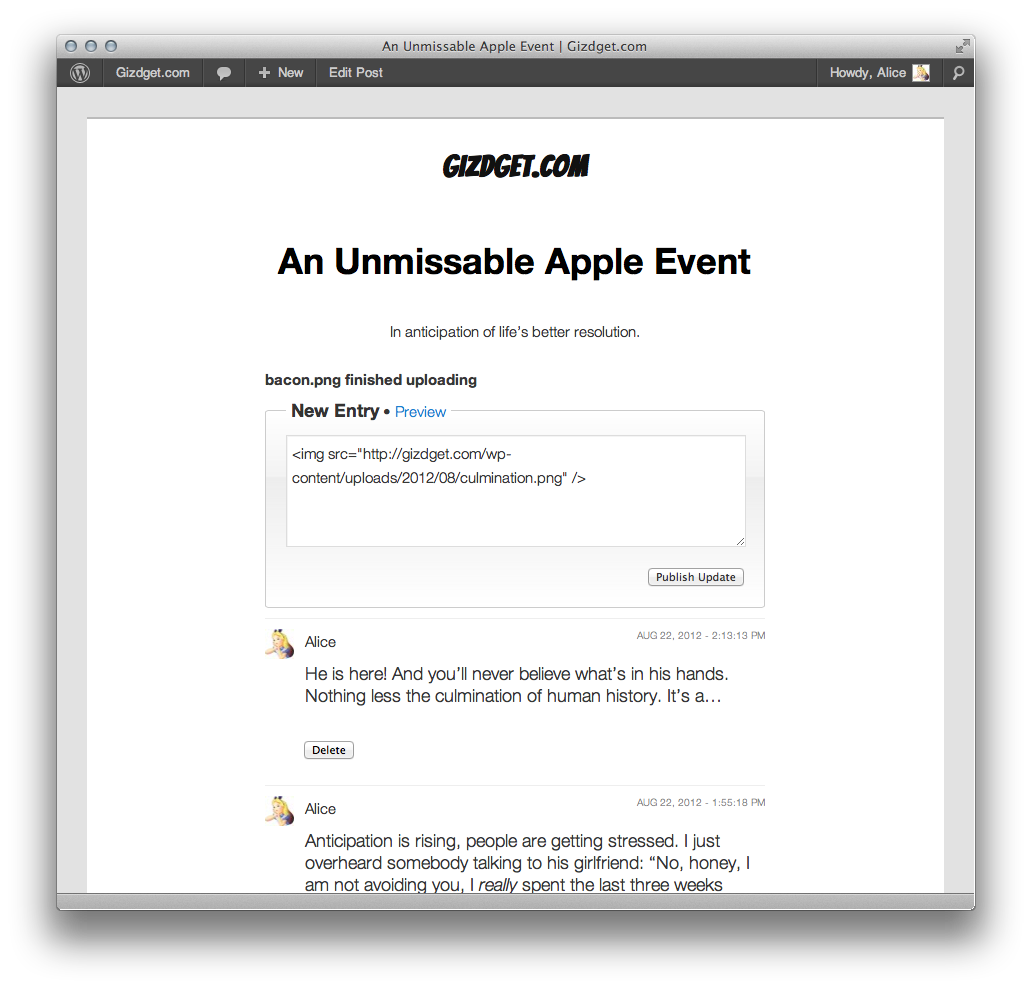
To add a photo to your update, simply drag-and-drop it into the posting box from your desktop. It will upload the image and include a link. To see the image, click "Preview."
You can also add photos from the internet by pasting in the direct URL to the image.

To embed the media, simply paste the URL while viewing the media into the posting box on its own line. More details can be found about each media type in the links below:

The liveblog posting box takes standard HTML formatting. To format text, simply wrap it in HTML tags.
Examples:
- <strong>bold</strong>
- <i>itals</i>
- <u>underline</u>
Links that are pasted directly the posting box will also be automatically hyperlinked.
Sometimes you may need to manually insert the Liveblog into your theme. For this, we provide a function which simply outputs the Liveblog HTML on a post where the Liveblog is enabled.
wpcom_liveblog_get_output
While a liveblog is enabled, you can edit previous posts by clicking the "Edit" button next to the update.

Once the event has wrapped up, you can archive your liveblog. This means that visitors will still be able to see the blog, but the editing tools will go away and the post will stop polling for updates. You can archive and re-enable a liveblog from the Edit Post page.

When a liveblog is archived, your editors will see a notification that says the liveblog must be enabled to accept new posts.

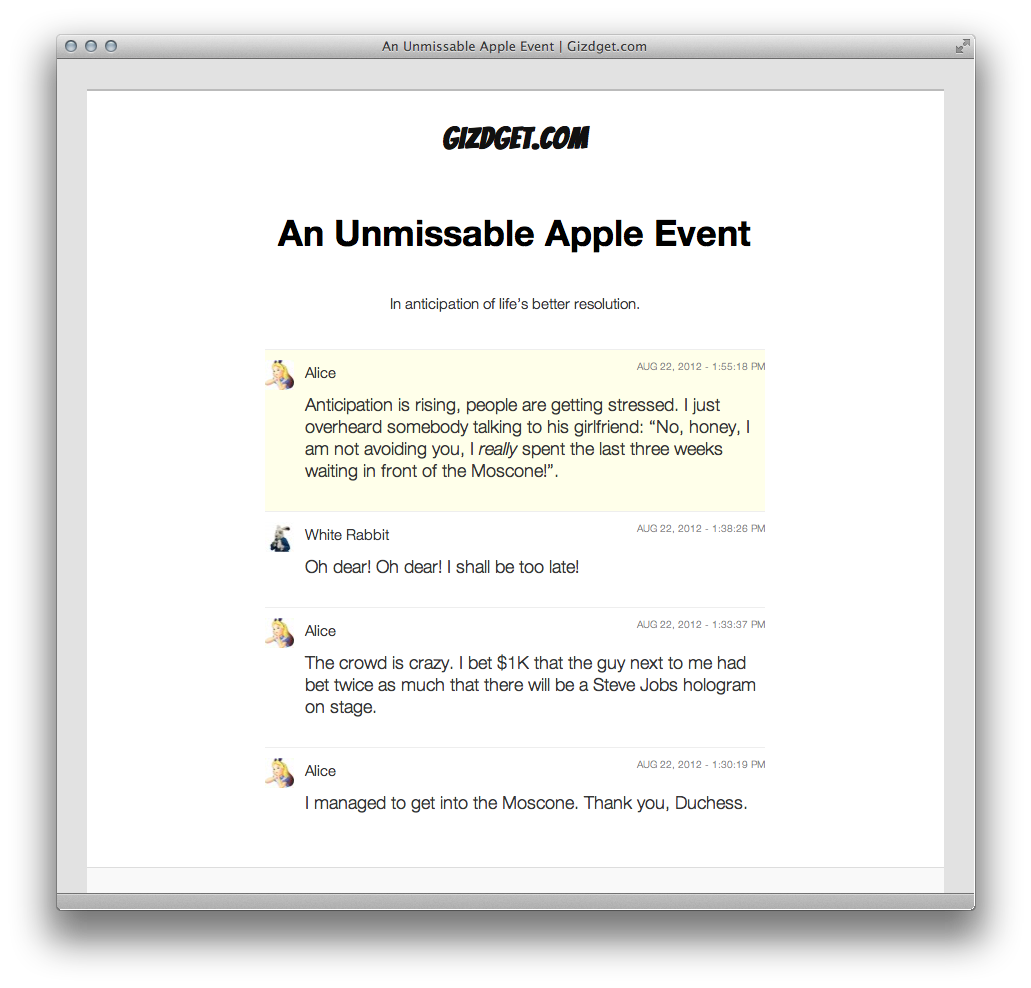
The liveblog uses smart updates, making it easy for your readers to enjoy your liveblog without being overwhelmed with updates. If the reader's browser is at the top of the post, new posts will automatically appear, highlighted in yellow.

However, if your reader has scrolled down the post to catch up on previous updates, liveblog will wait to update with new posts. Instead, a notification bar will appear at the top of the screen. When the reader clicks on the bar, the new updates will resume loading at the top of the page.

Post times are also now relative, which means it will display as “2 minutes ago,” with the time updating every minute.
Templates used by the plugin can be found in the /templates/ directory of the plugin.
You can edit these files in an upgrade-safe way using overrides. Copy the files you want to change into a directory named /liveblog within the root of your theme, keeping the same filename.
Eg: In order to override a single entry template copy templates/liveblog-single-entry.php to yourtheme/liveblog/liveblog-single-entry.php
The copied file will now override the Liveblog default template file.
Check out the related code on GitHub.
In case the /liveblog directory in the root of your theme is not what would suit your needs, you can take advantage of the liveblog_template_path filter and pass in a custom absolute path without trailing slash which would then be used for template look-up.